加速度センサー(MMA8452Q)を使いこなす
公開日: 2021年02月20日最終更新日: 2022年01月28日
電子工作で大体何でも作れるようになった話で用いるセンサについて、個別に機能を確認する方法を説明する記事です。
いきなり複数のセンサを組み合わせて確認するのは難しいので、個別にプログラムを作って使い方を理解していくのがよいです。 個別のモジュール確認として、この記事では加速度センサMMA8452Qの動作を確認する方法について記載します。モジュールの説明書とデータシートを確認しながらプログラムを作成します。
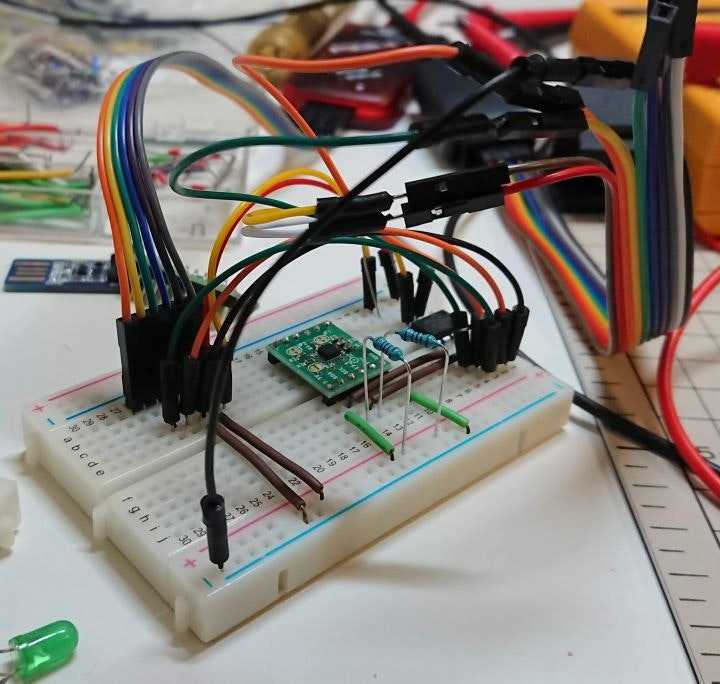
説明書を参考にブレッドボード上でセンサとPICを接続します。ここではPIC書き込み用の回路も一つのブレッドボード上に同居しています。
加速度センサの動作確認プログラム
データシートの情報通りに加速度センサとI2Cで通信するプログラムを作成します。ここで作成したプログラムでは1秒おきにMMA8452Qから加速度を取得し、シリアルで出力します(PCとUSBシリアルで接続して確認します)。このプログラムを実行しながらブレッドボードを傾けると出力される加速度の値が変わります。
加速でセンサの動作確認プログラムのコードを以下に示します。
I2Cの処理はMPLAB X IDEが生成したヘッダのコメント部分から持ってきています。
#include "mcc_generated_files/mcc.h"
#include <stdlib.h>
#define MMA8452_ADRS 0x1D
#define MMA8452_STATUS 0x00
#define MMA8452_XYZ_DATA_CFG 0x0E
#define MMA8452_CTRL_REG1 0x2A
#define MMA8452_CTRL_REG1_ACTV_BIT 0x01
#define MMA8452_WHO_AM_I 0x0D
#define MMA8452_CTRL_REG1_CONFIG 0x00
#define MMA8452_G_SCALE 2
#define SLAVE_I2C_GENERIC_RETRY_MAX 10
uint8_t g_buf[7] = {0, 0, 0, 0, 0, 0, 0};
void writeI2C(uint8_t addr, uint8_t* writeData, uint8_t len) {
I2C_MESSAGE_STATUS status;
I2C_MasterWrite(writeData, len, addr, &status);
while (status == I2C_MESSAGE_PENDING){
__delay_us(100);
}
}
void readI2C(uint8_t addr, uint8_t reg, uint8_t* readData, uint8_t len) {
I2C_MESSAGE_STATUS status;
I2C_TRANSACTION_REQUEST_BLOCK readTRB[2];
uint16_t timeOut;
// this initial value is important
status = I2C_MESSAGE_PENDING;
// we need to create the TRBs for a random read sequence to the EEPROM
// Build TRB for sending address
I2C_MasterWriteTRBBuild( &readTRB[0],
®,
1,
addr);
// Build TRB for receiving data
I2C_MasterReadTRBBuild( &readTRB[1],
readData,
len,
addr);
timeOut = 0;
while(status != I2C_MESSAGE_FAIL)
{
// now send the transactions
I2C_MasterTRBInsert(2, readTRB, &status);
// wait for the message to be sent or status has changed.
while(status == I2C_MESSAGE_PENDING){
__delay_us(100);
}
if (status == I2C_MESSAGE_COMPLETE)
break;
// if status is I2C_MESSAGE_ADDRESS_NO_ACK,
// or I2C_DATA_NO_ACK,
// The device may be busy and needs more time for the last
// write so we can retry writing the data, this is why we
// use a while loop here
// check for max retry and skip this byte
if (timeOut == SLAVE_I2C_GENERIC_RETRY_MAX)
break;
else
timeOut++;
}
}
void printSerial(uint8_t* data, uint8_t len) {
for(int i = 0; i < len; i++) {
EUSART_Write(data[i]);
}
}
void initMMA8452Q() {
uint8_t len = 1;
I2C_MESSAGE_STATUS status;
readI2C(MMA8452_ADRS, MMA8452_WHO_AM_I, &g_buf, 1);
printSerial(g_buf, 1);
g_buf[1] = 0x00;
g_buf[0] = MMA8452_CTRL_REG1;
writeI2C(MMA8452_ADRS, g_buf, 2);
printSerial(g_buf, 2);
g_buf[0] = MMA8452_XYZ_DATA_CFG;
g_buf[1] = (MMA8452_G_SCALE >> 2);
writeI2C(MMA8452_ADRS, g_buf, 2);
printSerial(g_buf, 2);
readI2C(MMA8452_ADRS, MMA8452_CTRL_REG1, &g_buf, 1);
printSerial(g_buf, 1);
g_buf[1] = MMA8452_CTRL_REG1_CONFIG | MMA8452_CTRL_REG1_ACTV_BIT;
g_buf[0] = MMA8452_CTRL_REG1;
writeI2C(MMA8452_ADRS, g_buf, 2);
}
void main(void)
{
// initialize the device
SYSTEM_Initialize();
// When using interrupts, you need to set the Global and Peripheral Interrupt Enable bits
// Use the following macros to:
// Enable the Global Interrupts
INTERRUPT_GlobalInterruptEnable();
// Enable the Peripheral Interrupts
INTERRUPT_PeripheralInterruptEnable();
// Disable the Global Interrupts
//INTERRUPT_GlobalInterruptDisable();
// Disable the Peripheral Interrupts
//INTERRUPT_PeripheralInterruptDisable();
__delay_ms(1000);
initMMA8452Q();
readI2C(MMA8452_ADRS, MMA8452_STATUS, &g_buf, 7);
while (1)
{
readI2C(MMA8452_ADRS, MMA8452_STATUS, &g_buf, 7);
printSerial(g_buf, 6);
__delay_ms(1000);
}
}感想
難しいことを一気にやろうとするのは大変です。
単純な物事に分解すれば個別に解決していくことができます。
これを続けていけばいずれ難しいこと全体を成し遂げることができます。
このような分割統治の考え方は自分が好きな原理の一つでもあります。
